Object Definition and Relationship Building
To add a User-Defined Dimension to Fixed Assets, please follow these steps.
Navigate to Fixed Assets > Asset > Object Definition
Click on “Relationships” and then click “New Relationships”
Select the UDD that you wish to add to the object. For example, “Grant.”
Click Next.
Choose the Relationship Type: “Many Objects to ONE (insert UDD name)”.
Navigate further down the page to the section titled “Add Lookup Fields to Pages.”
Check all Asset Pages that you want to have the selected UDD look-up field associated with, typically all 4 (so you could check 'select all', which will auto-check new asset, quick create, view asset, edit asset).
Click Save.
To edit any Views, navigate to Fixed Assets > choose a component in the dropdown (that you want to add your new UDD to) > List.
Do not edit any view with the word 'validation' in the view name.
Click the dropdown “View”, choose the view you want to add UDD to, and adjust as desired.
This functionality is the same as modifying a view anywhere else in Intacct. These are the most common views to edit:
All views of regular usage
All Assets
Assets by Class
Employee View
All Assets Acquired in Foreign Currency
All Live Assets by Category (with images)
All Disposed Assets by Category (with images)
To adjust any Data Maps, navigate to Fixed Assets > Asset > Object Definition
Make sure the field is in all the maps where it is needed.
In data maps, the same column must be in perfect match with the new field
Values of the old Description field must be forwarded to the new field
To adjust any Fields, navigate to Fixed Assets > Asset > Object Definition
Delete the old field (Made before the relationship with the UDD) if the new field is a replacement
The integration name of the new field can be updated to the original one.
Note: If the conversion had been possible initially (from a text area field to a text field), then all the updates would not have been needed.
For any Document Templates, if the UDD needs to be populated on the GL Batch after the financial depreciations are posted, then please follow these steps.
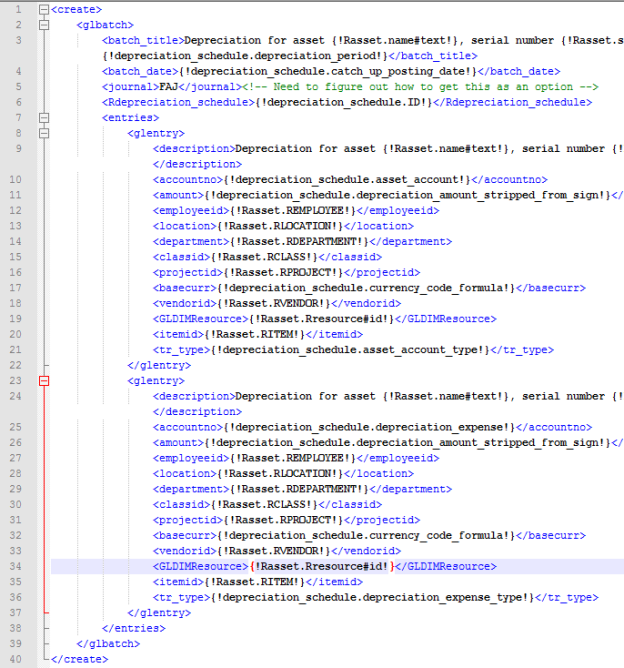
Navigate to Fixed Assets > Depreciation Schedules > Object Definition > Document Templates > API Create GLBatch. Download the template to your local machine and right-click on it to edit with Notepad++
After you open the document, it should look like something as shown in the screenshot on the right. You will notice that there are 2 pairs of <glentry>...</glentry> tags mentioned, and the UDD dimension to be included should be mentioned here twice, once in each tag.
The Integration name for the UDD referenced in the GL Entry and Asset objects is to be mentioned in this document.
To fetch the integration name for the GL Entry, navigate to Platform Services > Objects > GL Entry. Scroll down to the bottom of the list to the particular UDD you want to add. Let's hypothetically assume that UDD - “Resource” needs to be added. Thus, now copy the Integration name for Resource, which is “GLDIMResource.”
Paste it as shown in the screenshot on the right.
Now, we need to fetch the integration name for UDD from the Asset object to provide the relationship. Navigate to Fixed Assets > Asset > Object Definition > Fields. Find the UDD that you are looking for, in this case, “Resource.” Copy the Integration name “Rresource.”
Paste it in the document as shown below in between the <GLDIMResource>..</GLDIMResource> tags. Make sure to paste it twice in both </glentry>..</glentry> tags. The “Rasset” is added because it is the relationship name that we are fetching.
Save the template and upload it from where you fetched it (Refer step 22). The GL Batch should now appear upon posting of Financial Depreciations with the UDD.
Similarly, if the UDD dimension needs to be populated at any other places in FA Application, please refer to the following:
For Disposition, edit the “Post Disposition to GL Complete” template on the Asset object
For Placing an asset Out of Service, edit the “Create GL Batch - Out Of Service Asset” template on the Asset object
For CIP, edit the “Write to Expense” template on the CIP object
For CIP Asset, edit the “Capitalize - Post to GL” template on the CIP Asset object
Raise a support case and ensure it gets escalated to engineering in order to map the new dimension to the process of integration on an AP bill and an asset, and for depreciation posting from FA to the GL. This mapping process can only be done by engineering and is not accessible through the UI.


