PO Integration
To connect Purchasing to the Fixed Assets module, the PO Integration package is installed on the platform along with some script components. This package acts as a 'bridge' between the two modules, allowing automatic generation of an Asset after a Purchase Order is posted successfully.
Prerequisites - The following Purchasing Transaction Definitions have been configured and are available along with the Location and Department dimensions.
Purchase Requisition (PR)
Purchase Order (PO)
Vendor Invoice (VI)
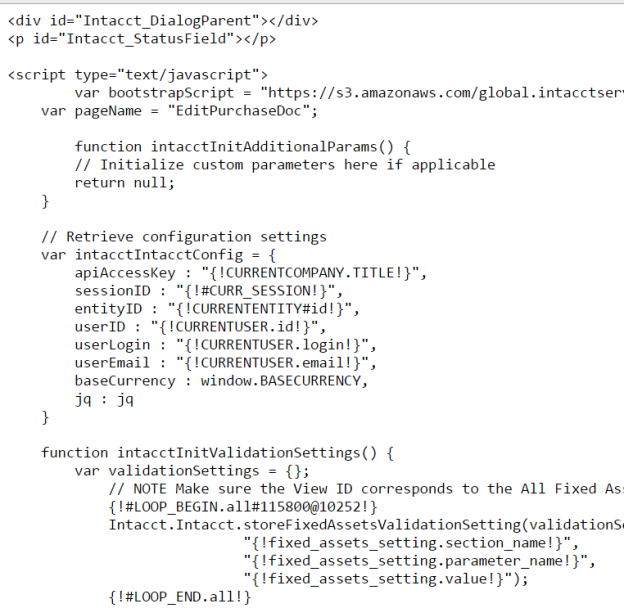
Once the initial transaction definitions have been configured, the script components must be added to all three pages —Edit, New, and View — for all three Transaction Definitions: PR, PO, and VI, before the package can be installed. (This is similar to the AP Bill Integration.) To do so, please follow these steps:
Navigate to Platform Services > Objects > Search for Vendor Invoice > Pages.
Click Edit on the Edit Vendor Invoice Page.
Drag a New <script Component> from the left side of the page and place it beneath the Edit Vendor Invoice. Then click Edit
Open the Edit Vendor Invoice file from the folder FA Setup Files > PO Integration.
Copy and paste the content found within that file into the script component on the page and save it. Then save the page.
Repeat steps 2 - 5 for the New and View pages.
Repeat all steps for all transaction definitions that are included within the PO integration Package. (By default, there are only 3: Purchase Requisition, Purchase Order, and Vendor Invoice)
Navigate to Platform Services > Objects > Search for Purchasing Document > Views.
Edit the “All Purchasing Documents” view with the “Order No” value set to 1 and its “Last updated” value set to the date of when the FA Application is installed (there will be at least 2 “All Purchasing Documents” views present).
Change the View Name from “All Purchasing Documents” to “FA All Purchasing Documents” and save. Reorder the views as follows: “All Purchasing Documents” and below that “FA All Purchasing Documents.”
Now, the PO integration Package can be added to the application. First, head to Platform Services > Custom Packages > New Package
Find and select the FA_PO-integration-v8.5 XML file within the FA Setup Files and click Import
Configuration for non-standard Transaction Definitions (TD)
If any other Purchasing Transaction needs to be configured for Fixed Assets, the following approach is recommended. We recommend using Notedpad++ for editing this package.
Let us hypothetically assume that only the Vendor Invoice TD needs to be configured. In the future, if more TDs are added and need to be configured, the same steps can be followed to add additional TDs.
Add the script components to Edit, New, and View Pages for Vendor Invoice by navigating to Purchasing > Vendor Invoice > Object Definition > Pages. Refer to the steps above if needed.
Open the file FA_PO-integration-v8.5 and right-click on Edit/Edit with Notepad.
Check the Excel config workbook to confirm which PO Transaction Definitions need to be configured. You only need to add the ones needed, not necessarily all of them (i.e., in our example, we're only adding the Vendor Invoice TD).
In the file, delete all custom fields for the Document Type Purchase Order and Purchase Requisition, along with the smart events for Purchase Order and Purchase Requisition, and keep only Vendor Invoice PO TD. The image below shows the selected area for only one Transaction Definition to be deleted, which is “Purchase Requisition.” Follow the same approach and select the five custom fields to be deleted for the Purchase Requisition Document Type as well. Delete the selected area now.
*Do not delete any tags which are in the plural form (contain an 's' at the end) , such as <customFields> or <smartLinks> etc!
Similarly, the smart link for Purchase Requisition and Purchase Order need to be deleted from the current document.
Navigate to the bottom of the document and select the content from <smartLink> and </smartLink> tags. The below image shows the selected area for Purchase Requisition. The same approach should be followed to select the smartlink tags for Purchase Order and both the smartlinks for each of the Transaction Definitions should thus be deleted.
After the smartlinks and Custom fields are deleted, the document should now contain only five custom fields and two smartlinks for Vendor Invoice Document Type.
The Excel Config Workbook will guide the requirements and determine if the Department and Location (each dimension) are mandatory or not. If they are mandatory, proceed towards the next step. If they are not mandatory, please go to ‘Location and Department Constraints for PO Integration’.
Import the document into your Intacct Instance by navigating to Platform Services > Packages and clicking on New Package.
Browse the FA_PO-integration-v8.5.xml file from your local files and click on Import.


