User Guide
Posting of Depreciation
Depreciation can be posted in the following two ways.
Individual/Detailed Posting: This posting method will create an individual GL batch for each depreciation schedule. Thus, if 100 depreciation schedules are submitted for posting, the application will create 100 unique GL batches. Each GL batch will contain two journal entries (one for the Accumulated Depreciation and another for the Depreciation expense account).
Summary Posting: This method will create a summarized GL batch based on the following order of the common grouping criteria for all the depreciations submitted via this option. Thus, if 100 depreciation schedules are submitted for posting, the application will create one GL batch with multiple journal entries.
The following steps need to be performed for posting financial depreciation schedules across multiple assets in bulk. If the depreciation schedules are required to be posted on an asset-by-asset basis, skip the first 2 steps.
Navigate to Fixed Assets > Depreciation Schedules.
Change the list view to Due Depreciation or any other view as desired based on your use case.
Select the specific depreciations to be posted or select All Records from the drop-down menu on the top right to select all due depreciation records.
Navigate to More Actions drop-down menu and select ‘Post Depreciation’ for individual/detailed posting or ‘Post Depreciation Summary’ for summary posting.
The application will run the final validation. Click Yes to submit the schedules for posting.
*If any of the assets were flagged with validation issues, a summary of the outstanding problems will be displayed at the top of the screen. You are urged to fix any issues listed as soon as possible because you will not be able to post depreciation for invalid assets. If a subset of records is valid, you will be able to proceed with posting for those records.
Also, if dimensions, such as Location or Department, are mandatory in GL transactions, please ensure that all the assets have been assigned those mandatory dimensions.
Once submitted, the application will change the schedule’s status to “In Progress.” After processing is complete, the application will update the status of the schedules to either ‘Posted’ (with a link to the GL batch) or ‘Failed’ with the reason for the error. Refresh the screen to see the results. You can also monitor status of your submission by navigating to Fixed Assets > Fixed Assets Logs. The following information will be accessible via the FA log tracker. Additionally, the application will also email the results to the email associated with your username if you have opted to receive an email.
Record Name: Depreciation Posting requested by *username*
Log Type: Depreciation Posting
Log Status: In Queue/In Progress/Completed/Failed
Message: Depreciation Schedule Ids of successful and failed records with the reason of the failure.
*If an allocation rule is assigned to an asset, the application will automatically split the allocation entry in the GL batch for depreciation expenses booked in the GL.
Depreciations Posted in Error
Navigate to General Ledger > Journal Entries > Fixed Assets Journal.
Delete all the journal entries for the depreciation schedules posted in error/too far into the future.
Caution: Please be careful while deleting journal entries – once they are deleted, they cannot be retrieved. Filter the entries out by date to delete entries in bulk.
Navigate to Fixed Assets > Depreciation Schedules and select all the schedules (filter them via Posting Date) posted incorrectly.
Change their status back to Created from Posted by selecting all Schedules > More Actions > Mass Update (Status Change).
Select Created for the Status field and click Save.
*If you don’t see the Status field, edit the Mass Update (Status Change) page in the Depreciation Schedule object to include the field. To do so, navigate to Fixed Assets > Depreciation Schedules > Object Definition > Pages > Mass Update (Status Change). Edit that page and drag-and-drop the field, “Status,” from the Available Component list and Save the page. Repeat Steps #4 & #5 to complete the process.
Example of a Summary Posting
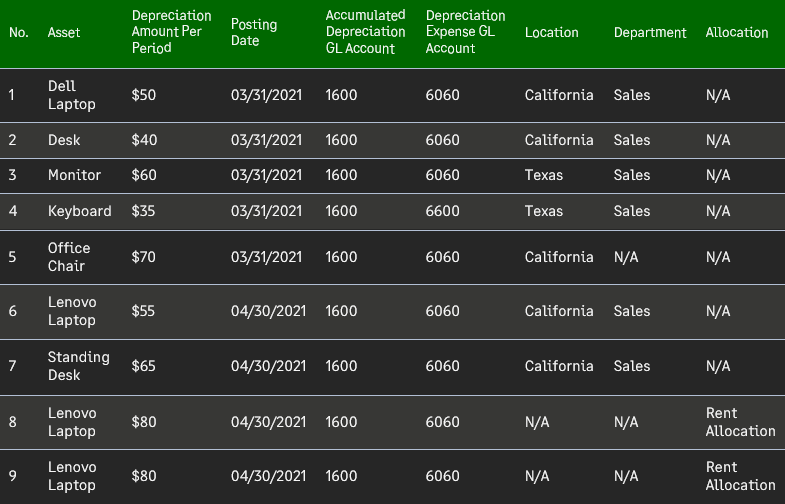
Results
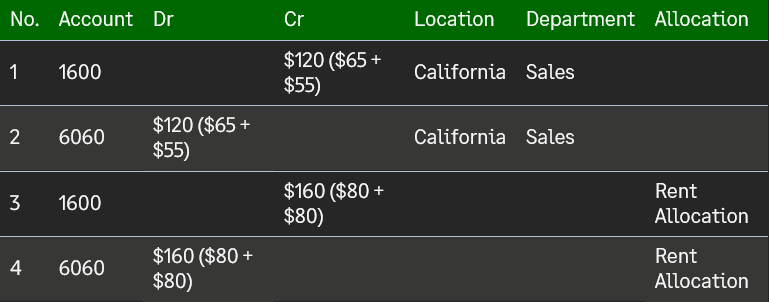
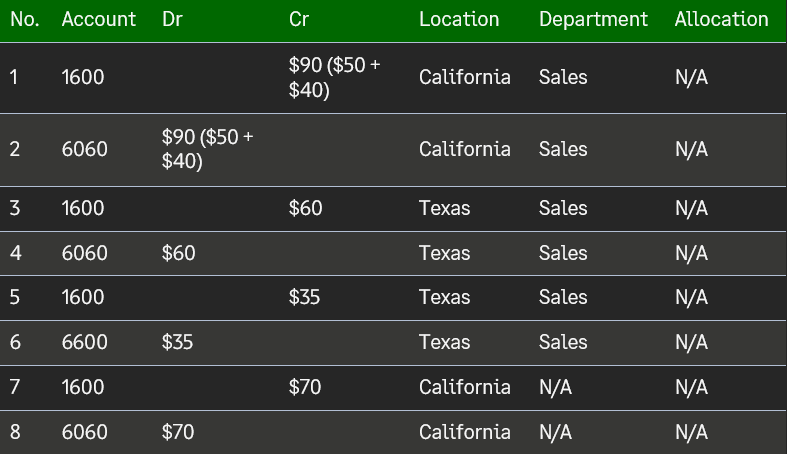
The application will create a total of two GL batches as shown below. Optionally, users can also review the depreciation summary record (Fixed Assets->Depreciation Summaries) quoted on the Memo of the journal entry line item to review the depreciation schedules involved in the summarized GL batch.
GL Batch 1, Posting Date: 03/31/2021
GL Batch 2, Posting Date: 04/30/2021