User Guide
Creating Fixed Assets
There are several methods for creating Fixed Assets: Manually creating Fixed Assets (including making a copy of an Asset), importing Fixed Assets in bulk, generating depreciations automatically via import, and creating a Fixed Asset from an AP Bill (AP), Vendor Invoice (PO), or Charge Card transaction (CC).
You can create an asset manually to enter an asset that didn’t come from an AP Bill, Vendor Invoice, or Charge Card transaction, either at the top or entity level. If Validation Rules (VR) are enabled, Assets can only be created at the entity. To create Assets at the top level, VR must be disabled.
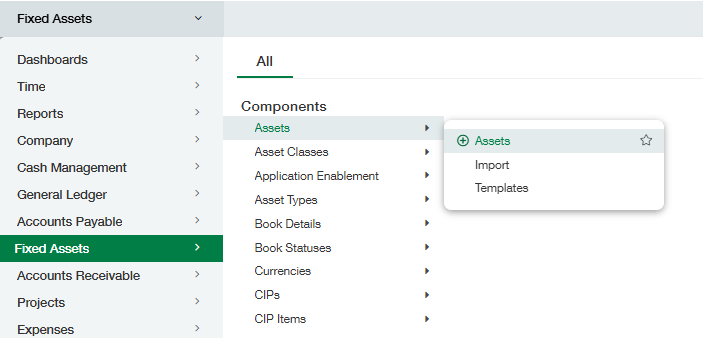
Navigate to Fixed Assets, then click on the + icon beside “Assets.”
There will be several fields that are required by default, such as Asset Name, Asset Class, Asset GL Posting Date, Date Placed In-Service, and Asset Cost Numeric
All of the required dimensions (location, department, etc.) can be found in the assignment section.
Optionally, enter a Description, and then click Save.
Copy an existing Asset
To copy an Asset, navigate from within your entity to Fixed Assets > Assets
Select the Asset or Assets to be copied and click on More actions > Copy Asset
The system will copy over the Asset Name, Asset Class, Date Placed in Service, Asset Cost, and all the dimensions from the original Asset to this new one.
The AP Bill field value (if any) will not be copied over, and the new Asset will be created with a status of “To Review.”
Changes can be made to the copied Asset if desired before placing it in service.
Creating an Asset from an AP Bill
Be sure to select a specific entity and then create an AP Bill within that entity, as the system will not allow the creation of an AP Bill at the root-level entity (if it is a multi-entity Intacct Instance) when Validation Rules are enabled.
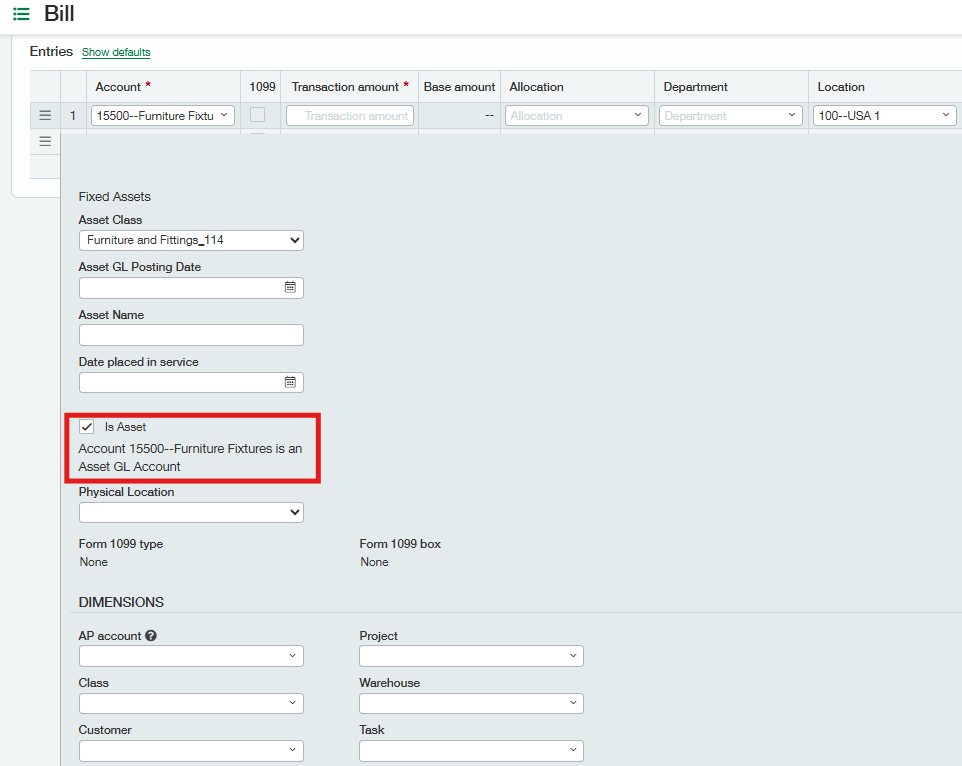
Create an AP Bill by navigating to Accounts Payable > Bills > Add and use the same GL Account with which you want to relate the associated Asset Class.
Populate the Vendor, Bill Number, Due Date, and Transaction Currency, and then navigate to the Entries section.
Populate the Account, Transaction Amount, Department, Location, Asset Name, Date Placed in Service, Asset Class, and any other dimensions you want in the Entries section.
Make sure to select the Account that you used to create an Asset Class to relate the particular AP Bill. After you select the account, the checkbox “is Asset” will determine whether it is a Fixed Asset Account or not, and accordingly, it will enable the Fixed Asset (Asset Name, Date Placed in Service, Asset Class) fields.
Click Post.
Navigate to Fixed Assets > Assets and you should be able to view the AP Bill as an Asset.
Creating an Asset through Purchasing
Navigate to the Transaction Definition appropriate to your setup.
Choose Vendor from the drop-down menu.
Enter Bill/PO No. and a Due Date.
Navigate to the Entries section.
Choose the appropriate Purchasing Item from the drop-down menu; the account associated with the Item must also be associated with an Asset Class set up in the FA module.
Set the value of the required dimensions, e.g., Department and Location.
Enter Trans Amount.
Click on Is Asset checkbox and enter the Asset Name, Asset GL Posting Date, Date Placed in Service (maybe a prior period such as the previous month or last quarter. Depreciations will be calculated based on Date Placed in Service), and Physical Location.
The Asset Class will automatically be selected by the system as per the configuration of the GL Account associated with the selected Item.
Click Post.