Leases
Generating Payment Transactions
Lease Accounting provides users with the flexibility to decide if the Lease Accounting Module should automatically post entries based on the Payment and Lease Schedules.
To enable or disable the automatic posting of payment transactions:
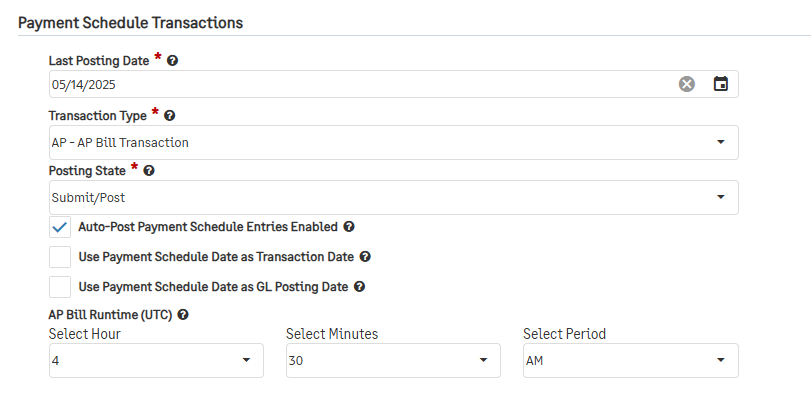
Navigate to Lease Accounting > Lease Configuration > scroll to the Payment Schedule Transactions section.
In the Last Posting Date field, enter a date to start generating transactions. This should be the day before the period you would like to generate for. No transactions will be created before that date.
The Transaction Type should be AP - AP Bill Transaction.
In the Posting State field, select if the system should generate transactions in the Submit/Post or Draft State.
Check the Auto-Post Payment Schedule Entries Enabled field.
Enter a runtime in the AP Bill Runtime (UTC) field.
Note: The system requires a runtime to trigger the process, but since you are manually triggering this run, the time selected will not affect the start time of your run. If you have configured your environment to auto-generate entries, you do not need to change it. Please keep in mind that if you do not want to auto-generate in the future, you will have to uncheck the auto-post box after your manual trigger.
Next, scroll to Generate Entries in the top right of the section.
A new window will pop up and provide the options to specify the following:
As of Date: This will be the last date that the system posts transactions for. Unlike the Last Posting Date, this date is inclusive. Once transactions are created, the As of Date will become the Last Posting Date.
GL Posting Date: This will specify the GL Posting date that should be on the transactions. If this date should be changed after the transactions have been generated, the date should be edited manually from within the journal entry itself.
Select Confirm, and the system will begin creating the transactions within the Last Posting Date and As of Date.
Note: It is recommended running this process for one period at a time. For example, if trying to generate for January 2024, enter a Last Posting Date of 12/31/2023 and an As of Date of 1/31/2024.
Generating Journal Entries
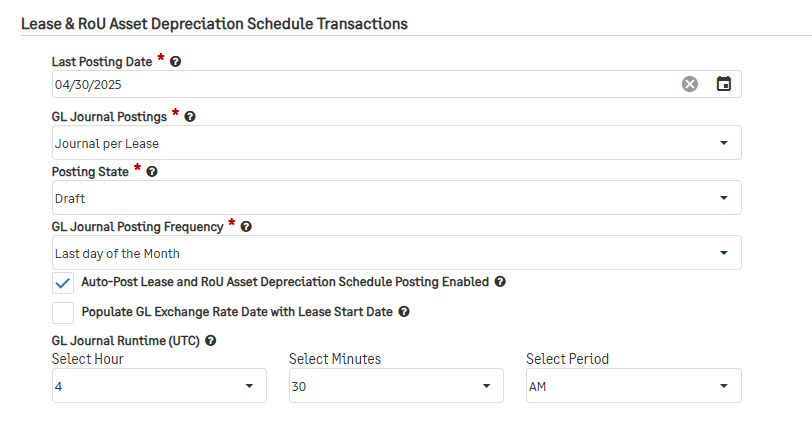
Go to Lease Accounting > Lease Configuration > scroll to the Lease & RoU Asset Depreciation Schedule Transaction section.
In the Last Posting Date field, enter a date to start generating entries. This should be the day before the period you would like to generate for. No transactions will be created before that date.
The GL Journal Posting field should be configured but will not impact the manual generating of the entries.
In the Posting State field, select if the system should generate transactions in the Submit/Post or Draft State.
Check the Auto-Post Lease and RoU Asset Depreciation Schedule Posting Enabled box.
Enter a runtime in the GL Journal Runtime (UTC) field.
Note: The system requires a runtime to trigger the process, but since you are manually triggering this run, the time selected will not affect the start time of your run. If you have configured your environment to auto-generate entries, you do not need to change it. Please keep in mind that if you do not want to auto-generate in the future, you will have to uncheck the auto-post box after your manual trigger.
Next, scroll to Generate Entries in the top right of the section.
A new window will pop up and provide the options to specify the following:
As of Date: This will be the last date that the system posts journal entries for. Unlike the Last Posting Date, this date is inclusive. Once journal entries are created, the As of Date will become the Last Posting Date.
GL Posting Date: This will specify the GL Posting date that should be on the entries. If this date should be changed after the transactions have been generated, the date should be edited manually from within the journal entry itself.
Select Confirm, and the system will begin creating the transactions within the Last Posting Date and As of Date.
Note: It is recommended running this process for one period at a time. For example, if trying to generate for January 2024, enter a Last Posting Date of 12/31/2023 and an As of Date of 1/31/2024.