Leases
Creating Leases
The first step to creating a lease is adding a lease to the system.
To create a lease:
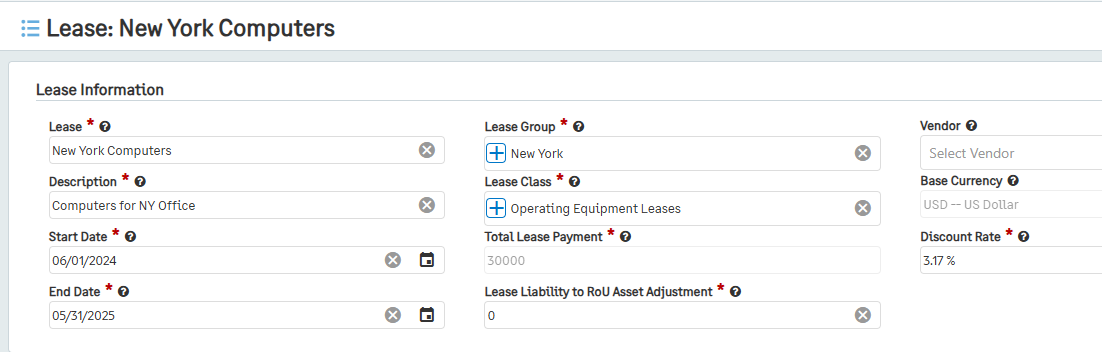
Go to Lease Accounting > Leases, then click the + icon beside Leases.
Enter the Start and End Date for the new lease.
The Start Date should be later than the start date of the legal agreement or the adoption of the accounting standard.
The End Date should be the end date of the legal agreement.
Next, select the Lease Group and Lease Class that this lease will belong to.
Lease Classes and Lease Groups can be created from within the lease by selecting the “+” symbol on the Lease Class and Lease Group fields.
For multiple-currency environments, select the Base Currency that the company is set up in.
Note: If the environment does not have multi-currency enabled, this field will not be an option.
Enter the Total Lease Payment for the new lease.
Enter the Lease Liability to RoU Asset Adjustment and Discount Rate.
Enter the Lease name and Description to easily identify the new lease.
If applicable, select a Vendor that will be associated with the lease.
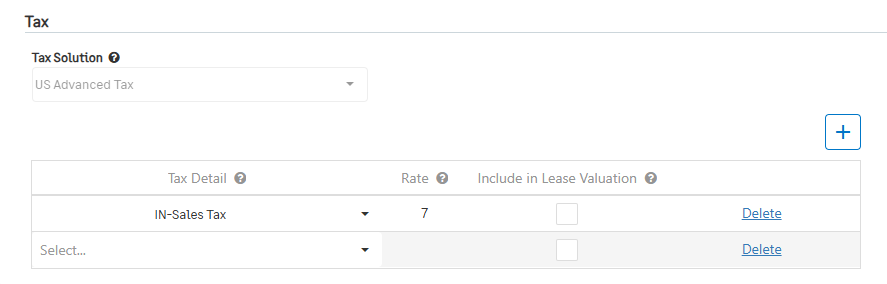
If the Taxes module is enabled for this environment, the Leases Tax section will be revealed when selecting the Lease Group.
The Tax Solution field will default to the location assigned to the selected Lease Group.
Using the + symbol located within the Tax section, add Tax Details to include in the Lease.
The Rate will automatically populate based on the rate assigned to the Tax Detail within the Taxes Module.
Note: These Tax Details and rates will be included within the payment schedule and AP Bills created by the Lease Accounting Module.
If a Tax Detail should be included in the Lease Valuation, enable the Include in Lease Valuation.
Note: Tax Details that do not impact the Lease Liability Value should have this setting disabled.
Multiple Tax Details can be added or removed..
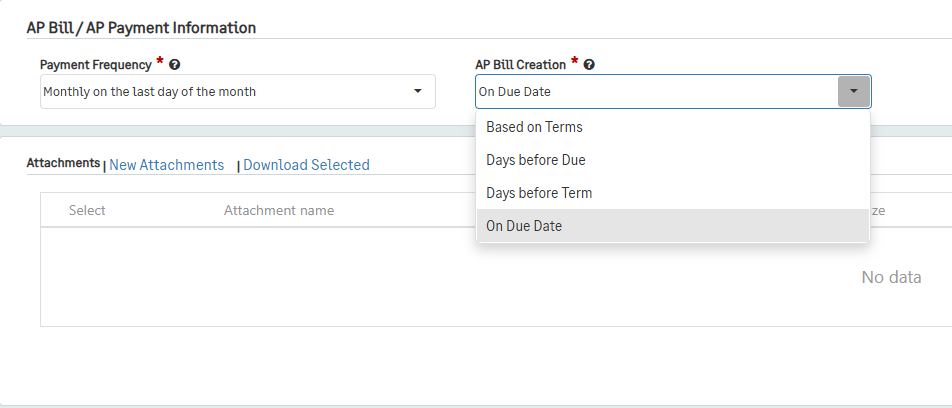
Select how often payments should be made in the Payment Frequency field.
Annually on a set date means that a payment will go towards the lease once a year on the same day; after selecting this option, choose the month and day for that selection in the Month and Day fields.
Monthly on a set day of the month means that a payment will be made on the same day of every month. After choosing this option, input the preferred day in the Day field. If the preferred day does not occur every month, the payment will be made on the closest day to the schedule (e.g. if the 29th is selected, the payment will be made on the 28th in February during all non-leap years).
Monthly on the last day of the month means that the payments will be made on the last day of every month between the start and end date.
Every x days from the Start Date means that the payments will be made every x number of days. The number of payments and the days that they will be made will depend on the selection for Payment Timing. After selecting this option, input how many days will occur between payments in the Number of Days field.
For example, if the payments should be made every 7 days from December 1 to January 1 in advance, the payments would be made on December 1, December 8, December 15, December 22, and December 29. In arrears, the payments would be made on December 4, December 11, December 18, December 25, and January 1.
Import means that you will provide your own CSV file detailing every payment that will be made from the start to end of the lease.
Note: If you select Import, Total Lease Payment will automatically override to 0 and update to the schedule payment sums after they are imported.
Additionally, after saving your lease, the Workflow Status will update to “Payment Schedules Generated.”
For instructions on how to import, please go to the Import Center section of the help guide.
Custom means that a unique payment frequency will be created. After selecting this option, input the date and amount for each payment that will be made.
Select when AP Bills should be created in the AP Bill Creation field.
When selecting “Based on Terms,” the AP bill will be created based on the predefined term definition for the selected Vendor. If no vendor is selected or if the vendor has no terms, AP bills will not be created.
When selecting “Days before Due,” the AP bill will be created based on a specified number of days before the next payment is due.
When selecting “Days before Term,” the AP bill will be created based on a specified number of days before the term ends.
When selecting “On Due Date,” the AP bill will be created on the date that the next payment occurs according to the Payment Date field on the lease.
Add any Attachments that will be helpful.
Click Save.
Now that you have created your lease, it is in the “Created” workflow status.