Setup Sage Intacct
Customer Management in Unipay
In addition to sending invoices to your payment provider and capturing payment methods, Unipay will also sync customers from Sage Intacct to your Payment Provider. Customer sync takes place at 1am and 1pm UTC and can be disabled or enabled within the Unipay Payment Account, which you will create later in this guide (A Payment account is a relationship between your Sage Intacct Company Entity or Top level, and your payment providers account. A company can have multiple payment accounts, relating each entity to different payment provider accounts. We will go over this in more detail in the next section of the guide). It is important to manage customers with existing payment methods prior to enabling customer sync as to avoid duplicate customer records in your payment providers account.
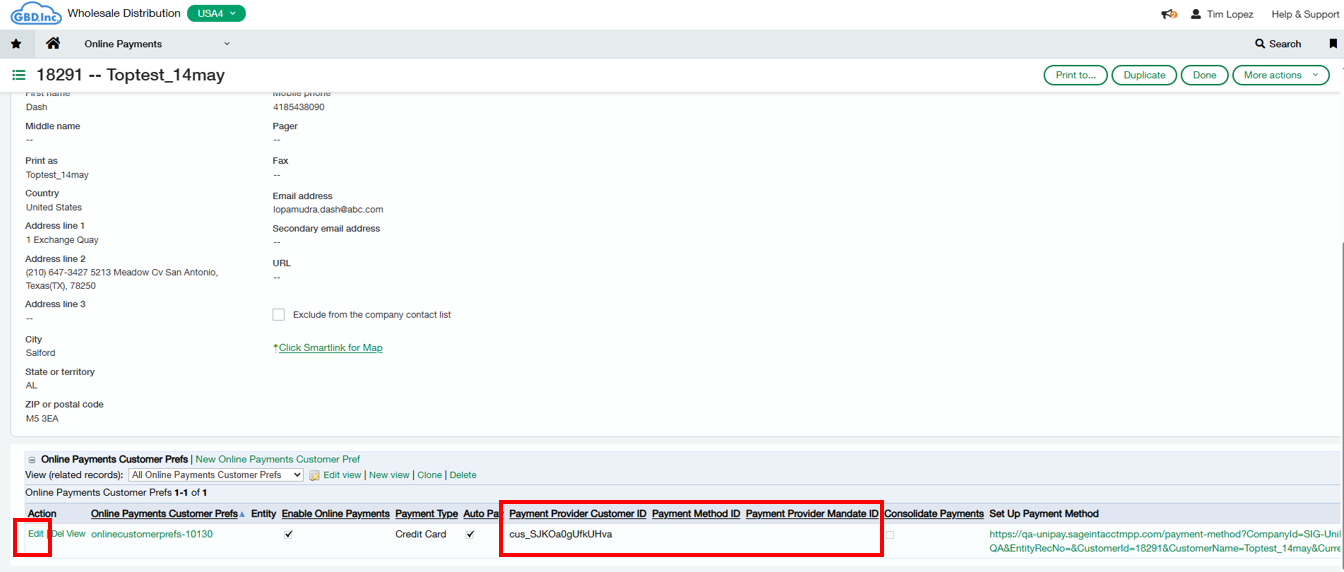
Unipay utilizes the Online Payment Customer Prefs object to manage the customer’s relationship to the Unipay Payment Account and Payment Provider. From this object, a user can manage autopay, the preferred payment method, payment provider customer id, payment method id or mandate id, and entity that is related to the payment account. With the Unipay solution, when a customer is created within Intacct, an Online Payment Customer Prefs record is generated. This record can be found by navigating to the entity the customer was generated>Applications>Accounts Receivable>Customers> view or edit the customer>Scroll down to the bottom of the page. Additionally, a user can find the record within Applications>Online Payments>Online Payments Customer Prefs. Below are the fields that can be found within this object and their purpose:
Online Payments Customer Prefs - This is the record associated this customer. A customer can have multiple of these records, but only 1 per entity or top level. This record allows for a customer to be linked to multiple payment accounts and payment providers. When a new customer is created, a record is automatically generated with the entity defaulted to the entity the customer was created. If the customer should be related to another payment account for another entity, the user will need to create a New Online Payment Customer Prefs.
Enable Online Payments - This enables or disables this customer for online payments through Unipay. If you wish to not allows this customer to be utilized within unipay, this should checked as false. By default, when the record is automictically generated, this setting is enabled.
Autopay - this enables or disables autopay for this customer. Autopay is a setting within Unipay that automatically attempts to send invoices to the payment provider. By default, this setting is off.
Payment Type - This setting allows a user the to set the allowable payment method. Below are the following options:
Any - Allows any payment method
ACH
Credit Card
Direct Debit (exclusive to GoCardless)
Instant Bank Pay (exclusive to GoCardless)
Direct Debit and Instant Bank Pay (exclusive to GoCardless)
Consolidate Payments - Allows the application to consolidate payment requests for invoices for a customer that are due on the same day.
Entity - This is the entity in which the Unipay will look at transactions for this customer. This entity will need to match the entity setup for the payment account in the middleware. A customer can have be linked to multiple entities, but transactions will go to the correct payment provider via the payment account assigned to that entity. Example - Entity 100 is associated to GoCardless, and Entity 200 is associated to Stripe, transactions in Entity 100 will go to GoCardless while Entity 200 transactions will go to Stripe. A unique Online Payment Customer Pref record will be needed for each entity if applicable.
Payment Provider Customer ID - This is the customer ID within the payment provider’s site for the existing customer. Fill this in to prevent the integration from creating a new customer and instead utilize the existing one.
Payment Provider Method ID - This field allows a user to provide the payment method ID for all other payment providers.
Preferred Mandate ID - This field allows you to provide the Mandate ID for accounts set up with GoCardless, or override what is stored within the middleware.
Setup Payment Method - This link will open a new window with the option to Share or Continue. •
Share – This select will copy a link which can be shared with the end Customer. This link will then take the end Customer through creating their payment method or mandate. The Mandate currency will default to the entity currency if the transaction is in a single entity, or utilize the currency or country assigned to the Customer record within Sage Intacct. Note, the URL is specific to customers. It is important to only send the link to the correct associated customer. •
Continue- This will take the user through the payment method/mandate creation. This is useful when a user is able to communicate with a customer directly, over the phone, or has the payment method details
The next section will review how to handle customers with existing payment methods or mandates, and how to avoid duplicate customers being created in your Payment Providers account.
Important - If you already have customers set up in your payment processor’s account, you should keep Customer Sync Disabled when initially setting up your Payment Account later in this guide. You should then update the Payment Provider fields in Intacct before syncing customers to protect against duplicates.