Setup Unipay
IN THIS LESSON
Time to Create a Unipay Payment Account
To create a payment account (connection between a Sage Intacct Company to a Payment Processor), a user will:
Navigate to the Unipay site and using the credentials created during registration, log into Unipay.
Once logged in, the first screen present is your Payment Account List which lists all the connections between Sage Intacct and the different Payment Providers.
A user can edit a Payment by selecting the Pencil Icon on the last column of the table, or select Add New Payment Account to create a new connection.
We are now in the Add New Payment Account screen. Below is a list of all the fields and definition:
Payment Account ID – This is automatically populated when the account is created, and is based on Sage Intacct Company entered.
Payment Account Name – This is a user-defined field, and should be a unique identifier for this account.
Sage Intacct Company ID – This is Sage Intacct Company ID.
Sage Intacct User ID – This is the Web Services User ID created in Step 1 of this guide.
Sage Intacct User Password – This is the Web Services User Password created in earlier in the course.
Get Entities – This button will run an API call to get the entity list from the Sage Intacct Company provided.
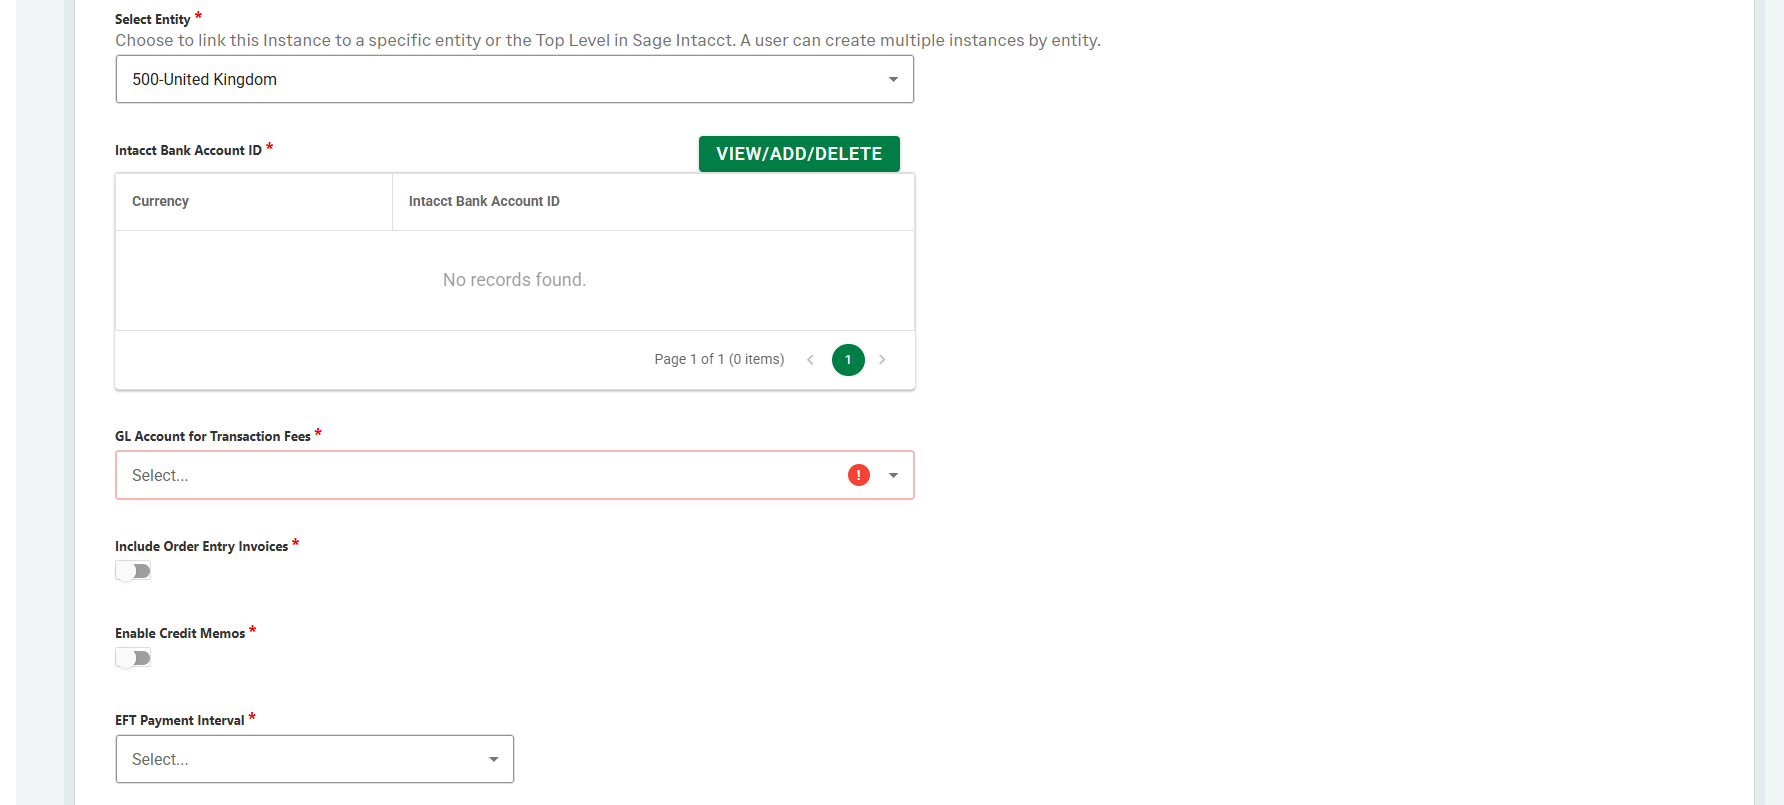
Select Entity – This is a list of Entities from the defined Sage Intacct Company. The Unipay application will get the Invoice information from the entity selected. A user may also select the top level if transactions are entered at the top level. If this is a multi-entity environment, you will create a new Payment Account for each entity.
Intacct Bank Account ID – This table allows a user to add multiple bank Accounts that can be used when the integration creates the payment back into Intacct. When adding a bank account, the user will specify the Transaction Currency for which this bank account should be associated. When the application creates the payment within Sage Intacct, it will utilize the correct bank account based on the invoice transaction currency and the bank account associated with that currency in this table.
GL Account for Transaction Fees - For customers whose payment provider fees are deducted per transaction, the integration will account for the difference between the invoice amount (paid) vs. the amount deposited in the customer’s bank by the payment process and create the necessary GL Journal Entry using the Interest and Charges feature in Cash Management. This field stores the GL account that will be utilized when the application creates the Bank Interest and Charges transaction in Sage Intacct.
Order Entry Invoices – This toggle allows a user to specify if they are generating invoices from Order Entry. If you are not using Order Entry, and invoices are being generated directly from Accounts Receivable within Intacct, you will leave this toggle off.
EFT Payment Interval - This setting allows a user to determine when the application should apply the payment back into Intacct for EFT payments. Below are the options:
Wait for Provider Response - The application will not apply the payment within intacct until the webhook events have informed Unipay that the payment request has been processed.
0-10 - This is the option where a user can have the integration create the payment X amount of days after a payment request is made. 0 means the application will create the payment in intacct when a payment request is made to your payment provider. 1 means that 1 day after the payment request is made, the payment will be applied in Intacct. A user can choose X amount of days all the way up to 10.
Pay Now Lookback Date (mm/dd/yyyy) - This setting allows a user to specify how far back the system can allow end customers to utilize the pay now link on their invoices. Meaning, any Pay Now links selected by customers for invoices due prior to this date will lead to an error and no payment request being made. This is to protect against potential duplicates when transitioning from a different payment processing service or for payment requests already sent to your payment processor.
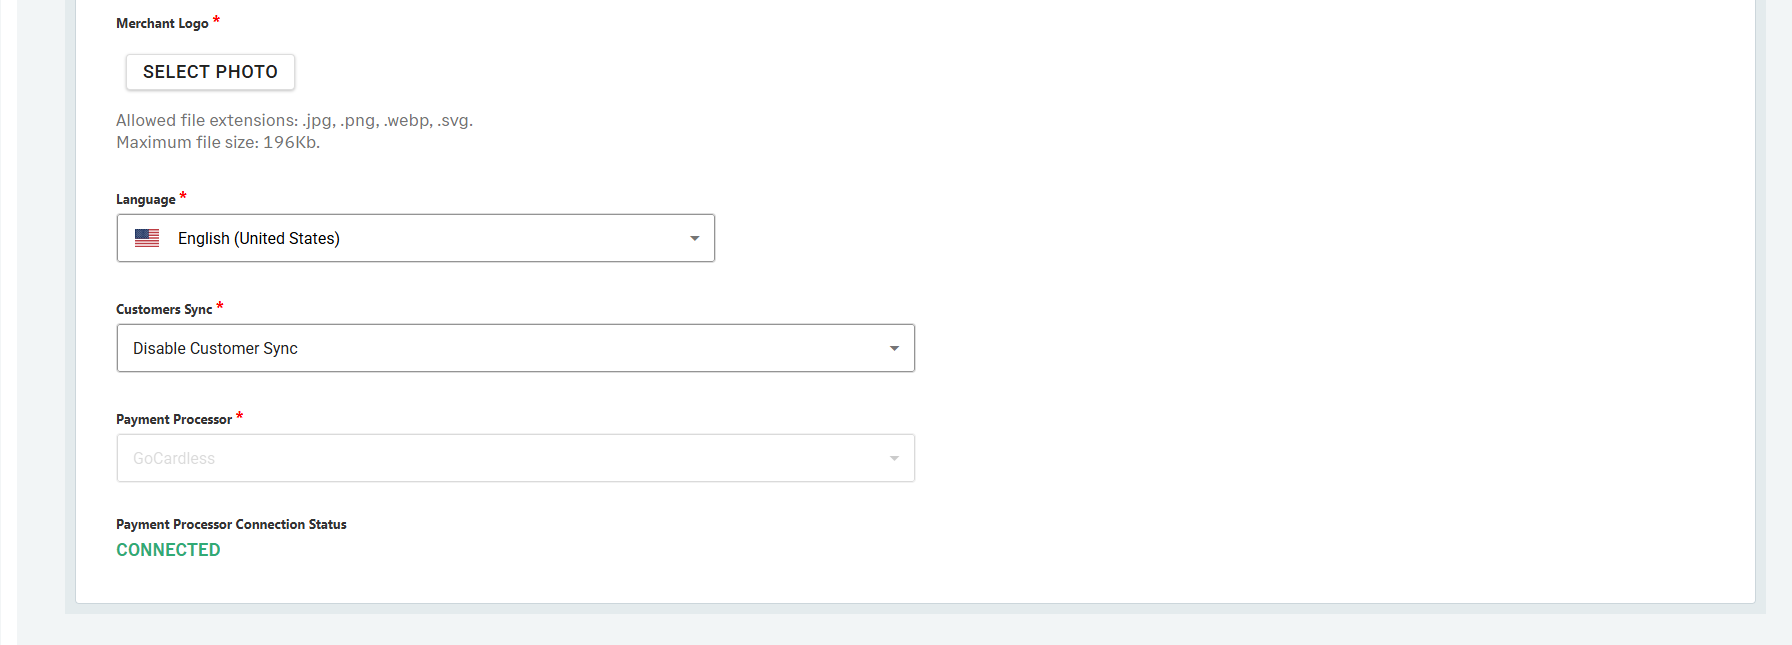
Merchant logo - This allows a user the ability to include a merchant logo image on the Pay Now pages.
Language – This field specifies the default Language for customers, and the emails they would respond from the Integration.
Customer Sync – This field determines the Customer sync behavior of the payment account. The Unipay application Customer Sync runs twice per day, 1 am and 1 pm UTC.
Note, if you have existing customers created with your Payment Processor, you should first set this option to Disable Customer Sync until your customers are updated within Sage Intacct.
There are 3 options for Customer Sync:
Sync Sage Intacct Customers to Payment Provider – This option will sync customers from Sage Intacct to the middleware (Unipay Application), and create the Customer on the Payment Providers side.
Sync Sage Intacct Customers only to Middleware – This option will only sync Sage Intacct Customers to the Middleware. The solution will not sync and create customers on the Payment Processors side. It will be up to the user to update the Payment Provider Customer ID, Payment Method, and/or Payment Provider Mandate ID fields within Sage Intacct Customer Record with the existing Payment Providers Customer ID, Payment Method ID, or Mandate ID. This is beneficial for users who plan to setup the Customer and payment method within the Payment Processors site before Sage Intacct.
Note, when this selection is utilized, if the Payment Provider Customer ID and the Payment Method ID or Payment Provider Mandate ID are not filled in within Intacct, the Integration will not be able to pass invoices to the Payment Processor for Payment Processing via AutoPay or Pay Now. The AutoPay feature will not Email customers requesting for mandates to be created. The AutoPay feature will still Email end customers of payments being processed by the Payment processor. This configuration requires a user to manually update Sage Intacct with the Payment Provider Customer ID and Payment Method to Mandate ID.
Disable Customer Sync – This option disables the syncing of customers to the middleware and Payment Processor. As mentioned above, this option should be used initially if you have existing customers, payment methods or mandates setup on the Payment Processor side.
Payment Processor - Here is where a user specifies the Payment Processor. Additionally, once a payment process is selected, a pop up a window to the processor site will appear. A user can then enter their credentials linking Unipay to their Payment Processor. Currently, Stripe and GoCardless are supported.
Payment Processor Connection Status – This will provide the status of the connection between the Payment Processor, Unipay, and the Sage Intacct Company.